Google Postmaster Tools
Google Postmaster Tools

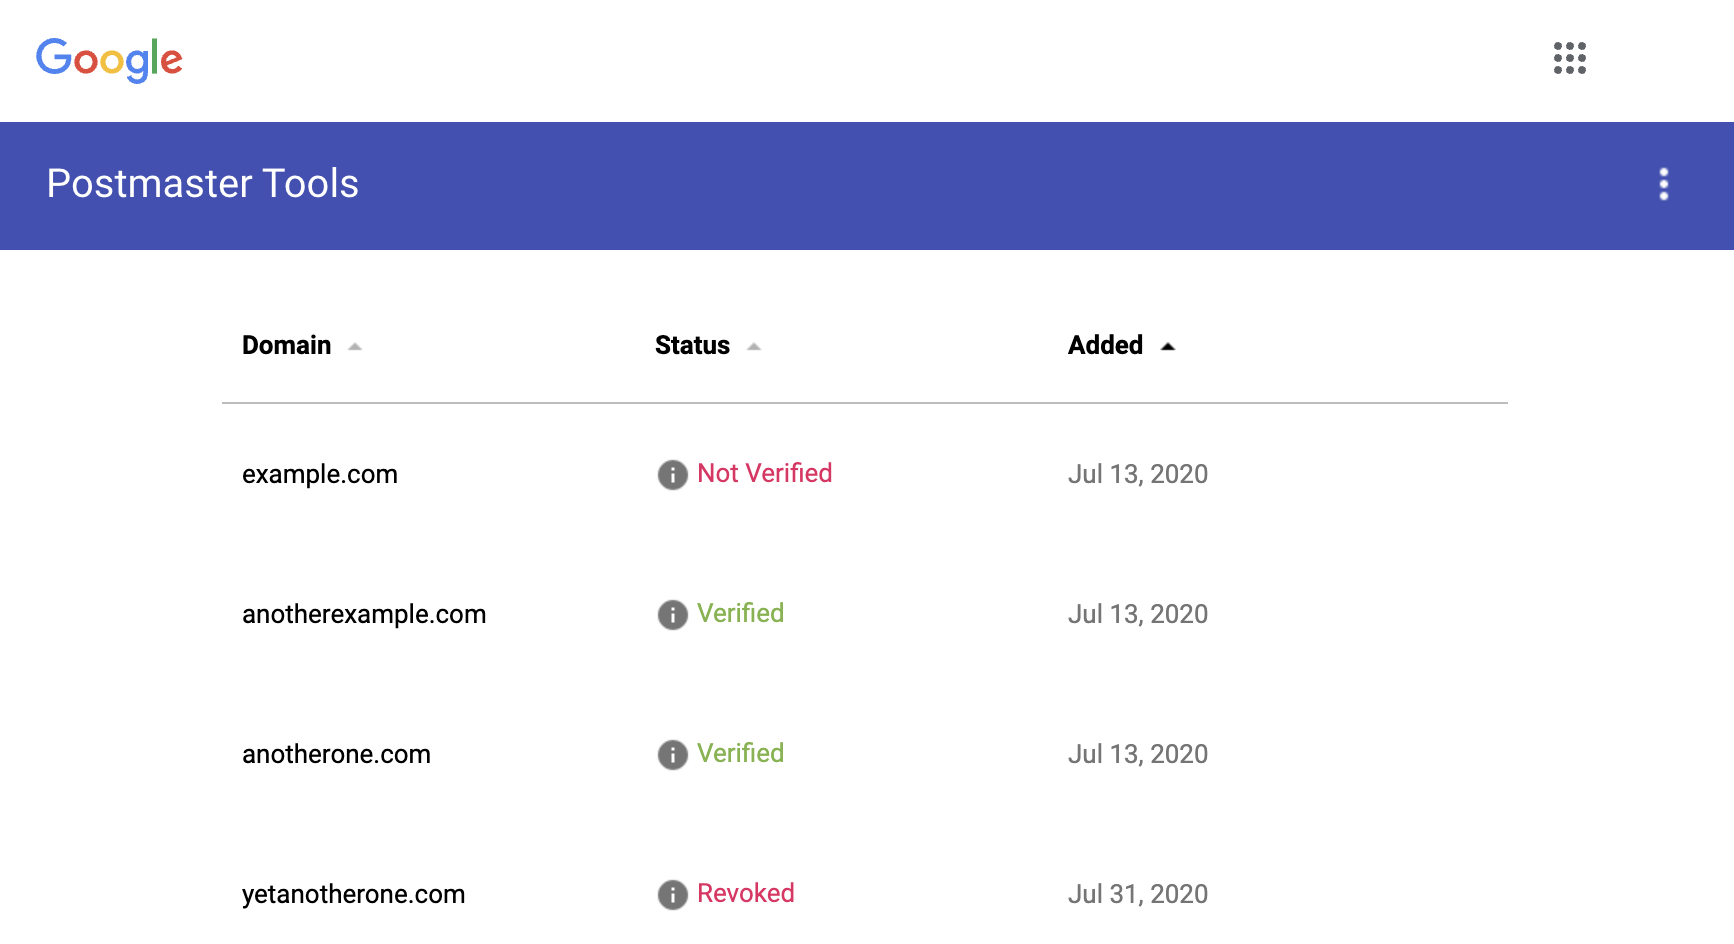
Homepage
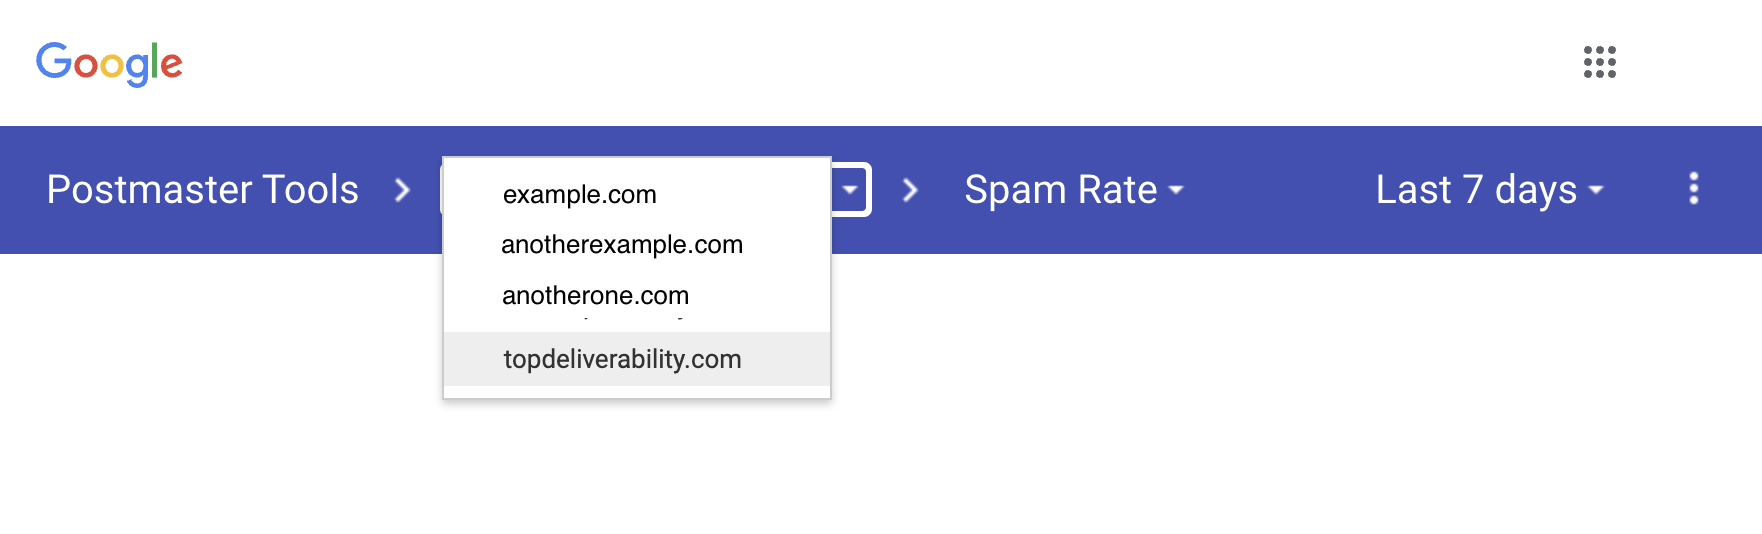
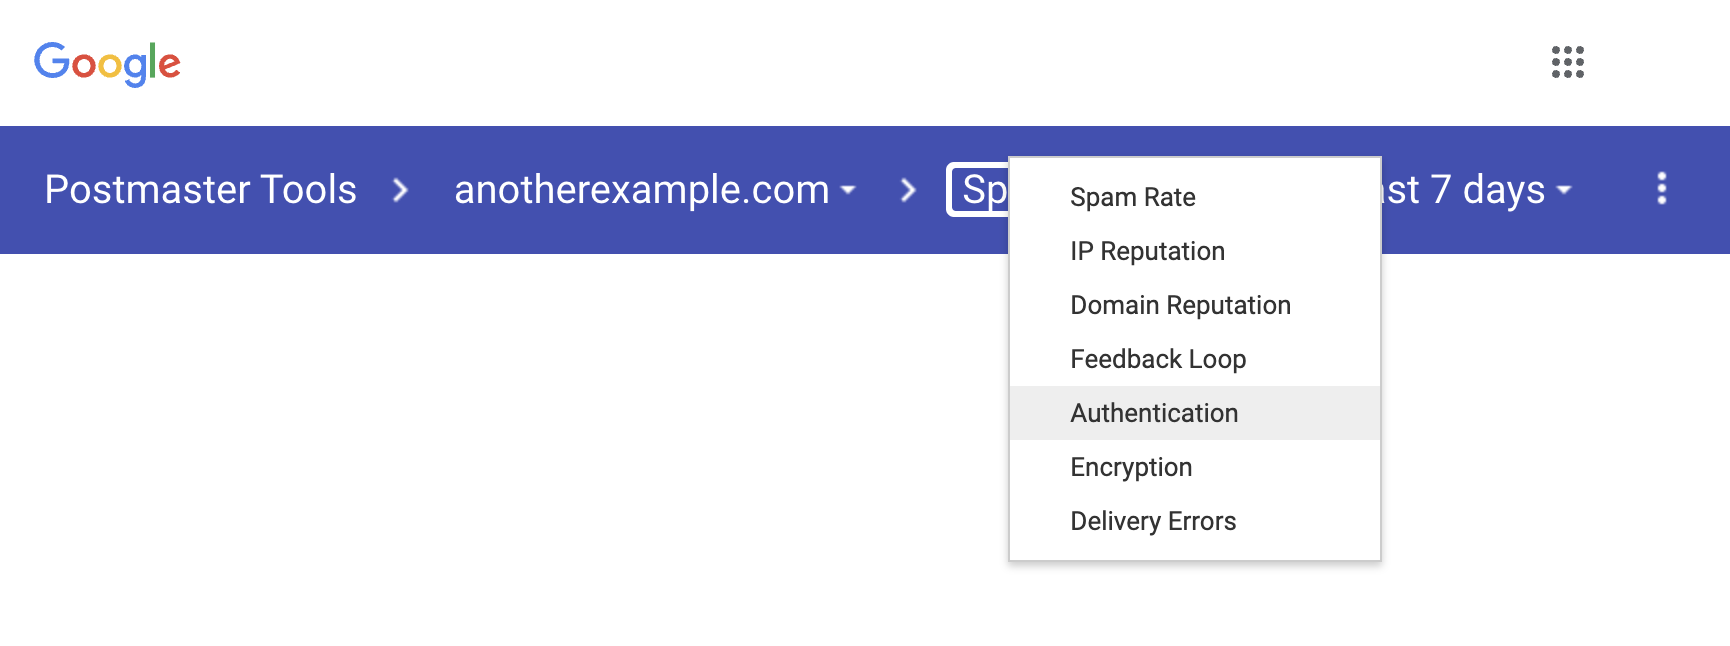
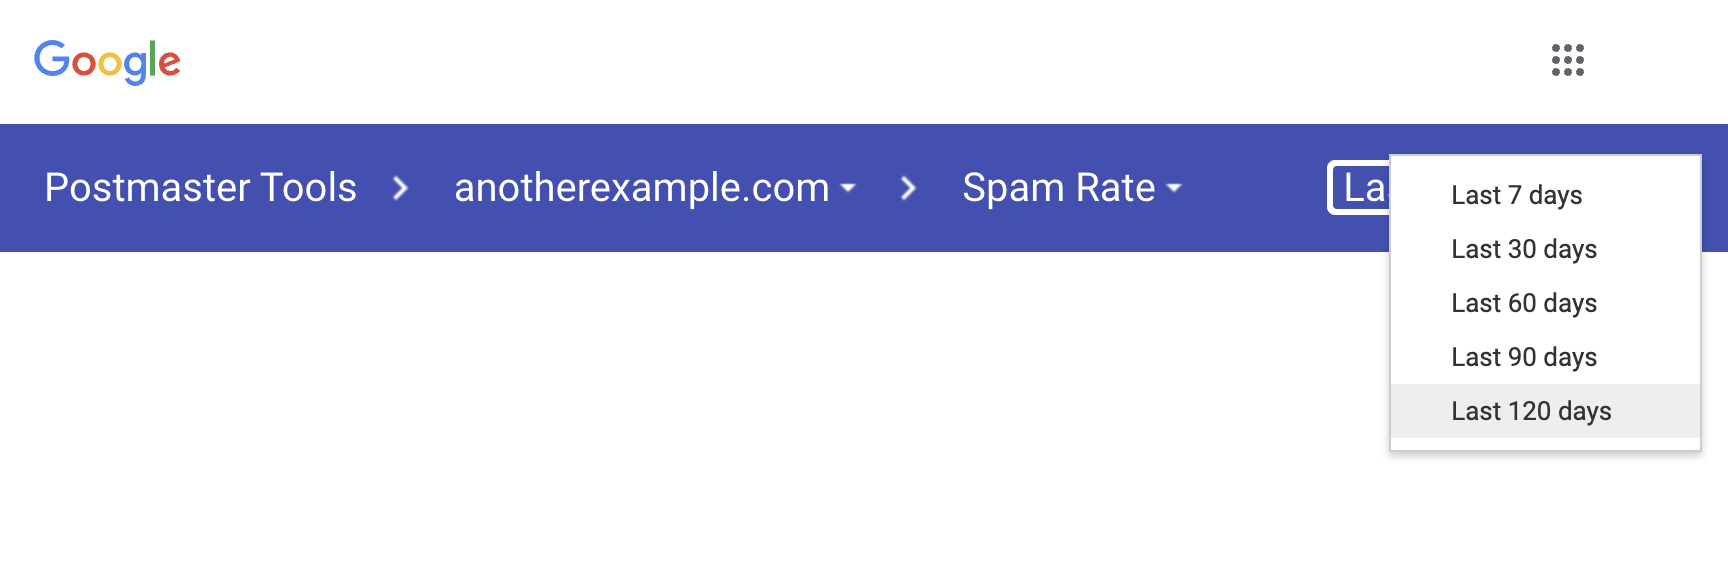
Navigation Bar

From the navigation bar you can switch between Domains:
Different Metrics:
And timeframes:
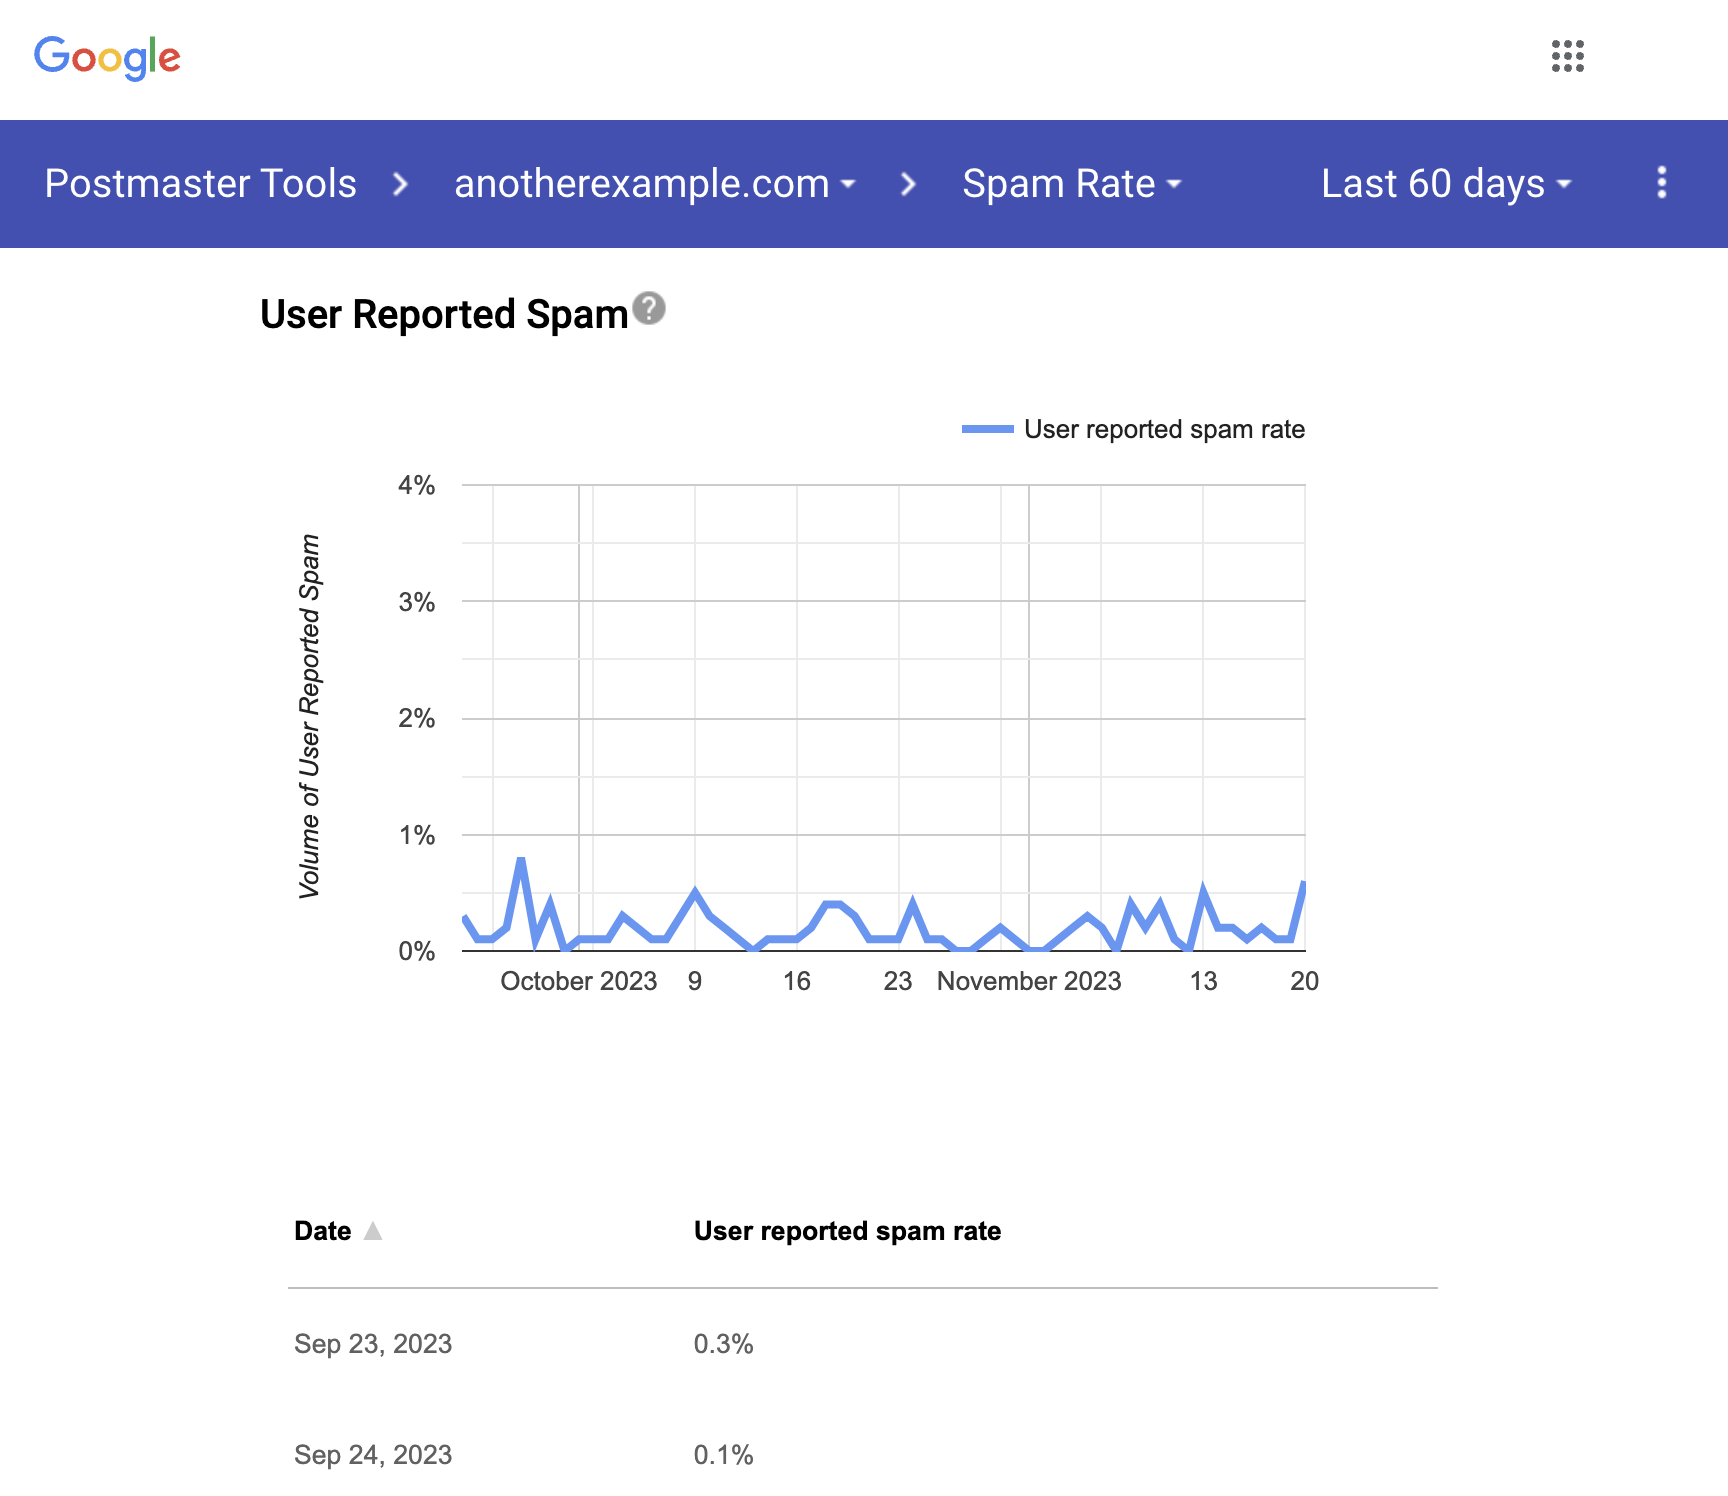
The spam rate is the percentage of emails marked as spam by users vs emails sent to the inbox for active users.
If a substantial number of emails are delivered directly to spam folders, you may see a low spam rate even though users may still be marking your inboxed emails as spam.
NOTES
- Emails delivered directly to the spam folder are not included in the spam rate calculation.
- Only emails authenticated by DKIM are eligible for spam-rate calculation.
- You SHOULD keep your Spam Rate under the 0.1% mark
- You MUST keep your Spam Rate away from the 0.3% mark
Example:
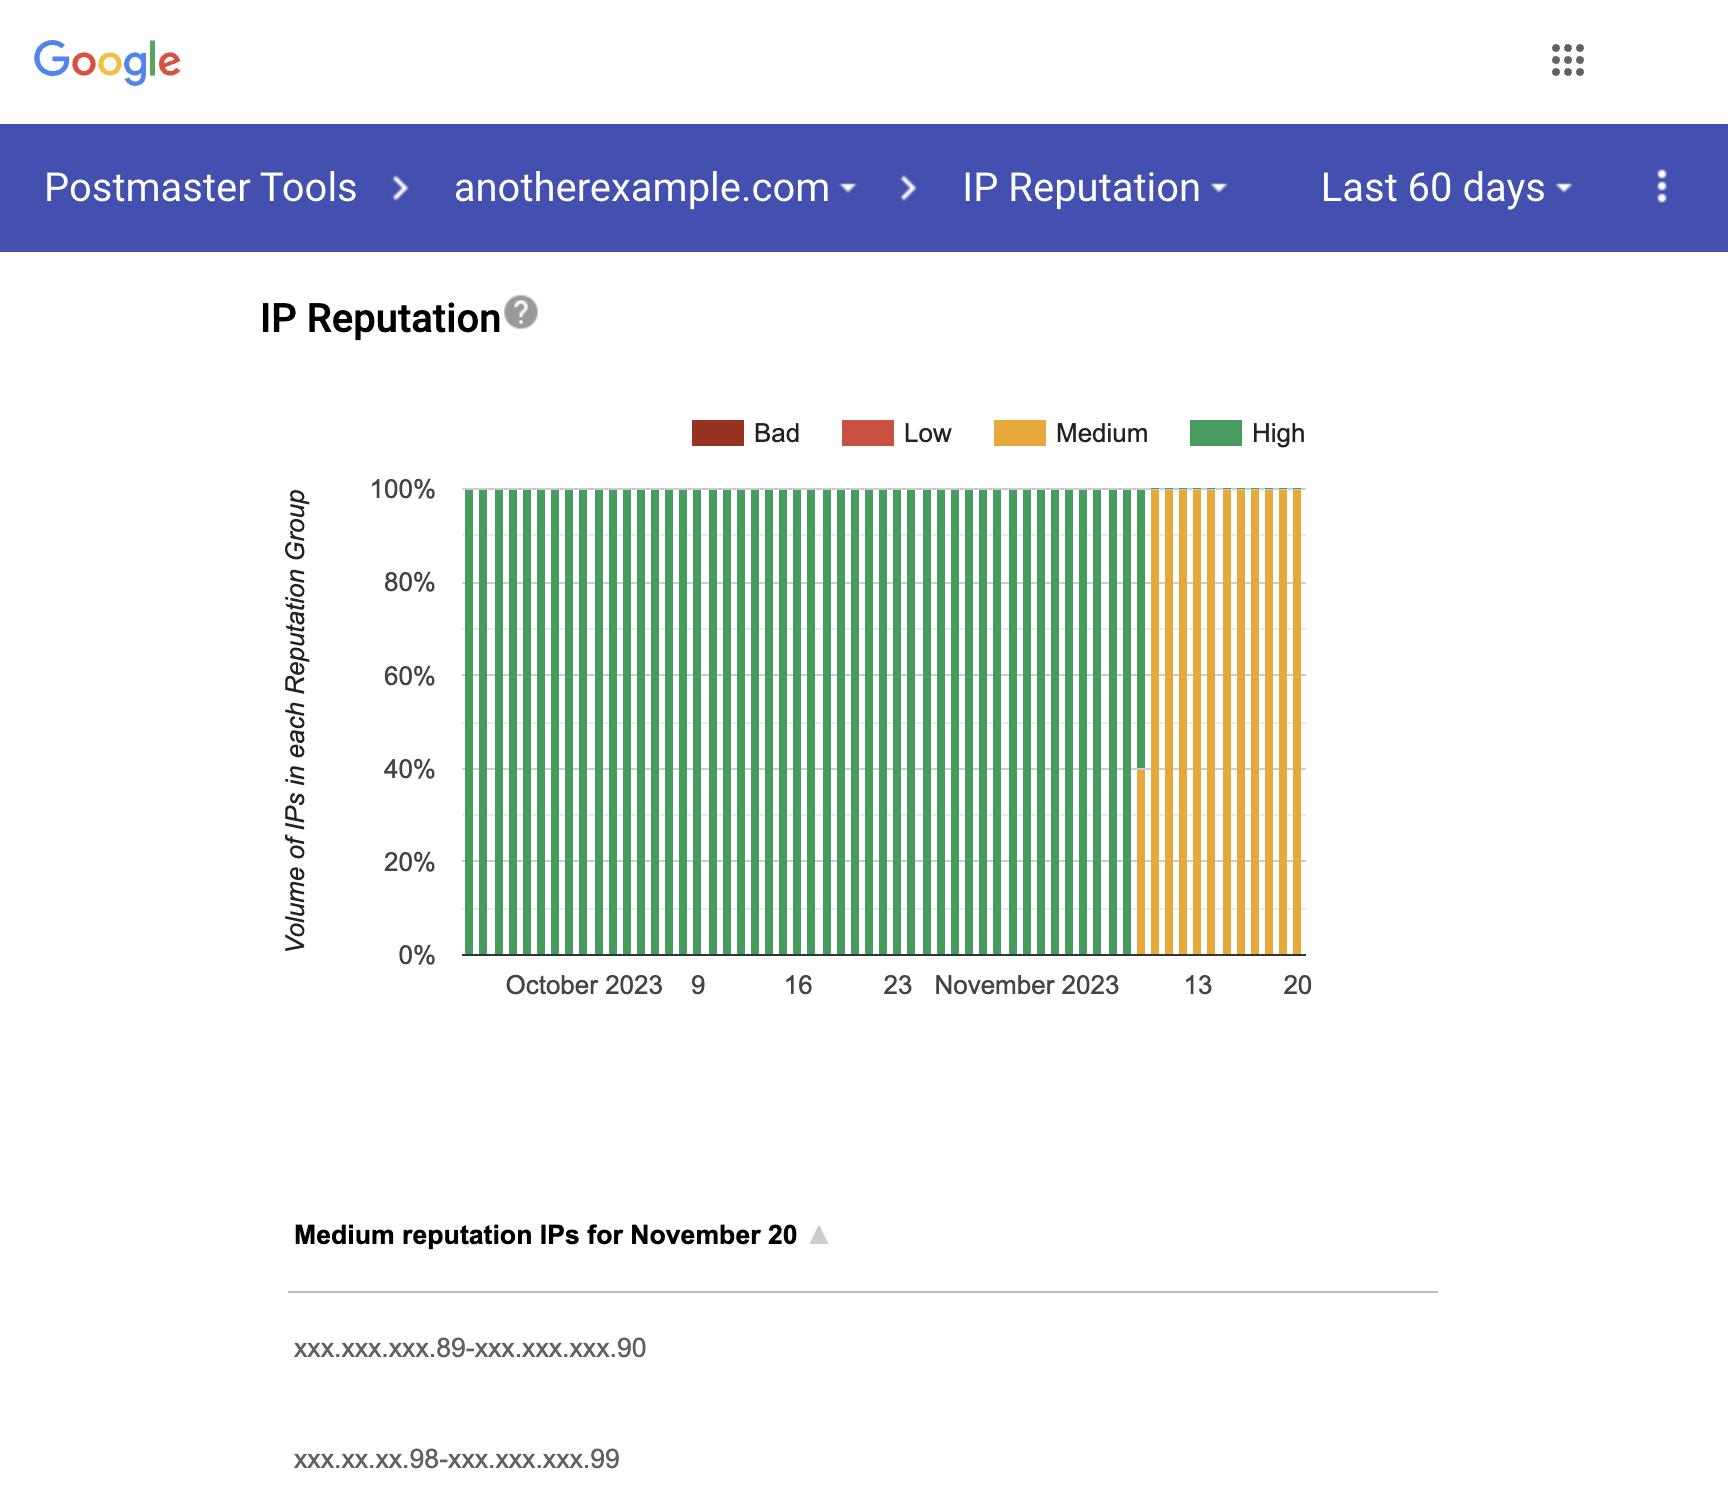
A higher IP reputation means emails sent from this IP are more likely to go to a recipient’s inbox instead of their spam folder. For example, if you send a lot of emails, and users mark them as spam, your IP reputation number will go down.
To reduce negative user feedback, you should regularly check your sending list. Be sure to only send emails to users who want your emails.
About reputations
The definitions of spam below includes mail detected as spam by Gmail’s Spam filter, and mail reported by users as Spam.
- Bad: A history of sending a high volume of spam. Mail coming from this entity will almost always be rejected at connection time or marked as spam.
- Low: Known to send a considerable volume of spam regularly, and mail from this sender will likely be marked as spam.
- Medium/Fair: Known to send good mail, but has occasionally sent a low volume of spam. Most of the email from this entity will have a fair deliverability rate, except when there’s a notable increase in spam levels.
- High: Has a good track record of a very low spam rate, and complies with Gmail’s sender guidelines. Mail will rarely be marked by the spam filter.
Tip: Keep in mind that spam filtering is based on thousands of signals, and IP reputation is just one of them.
Example:
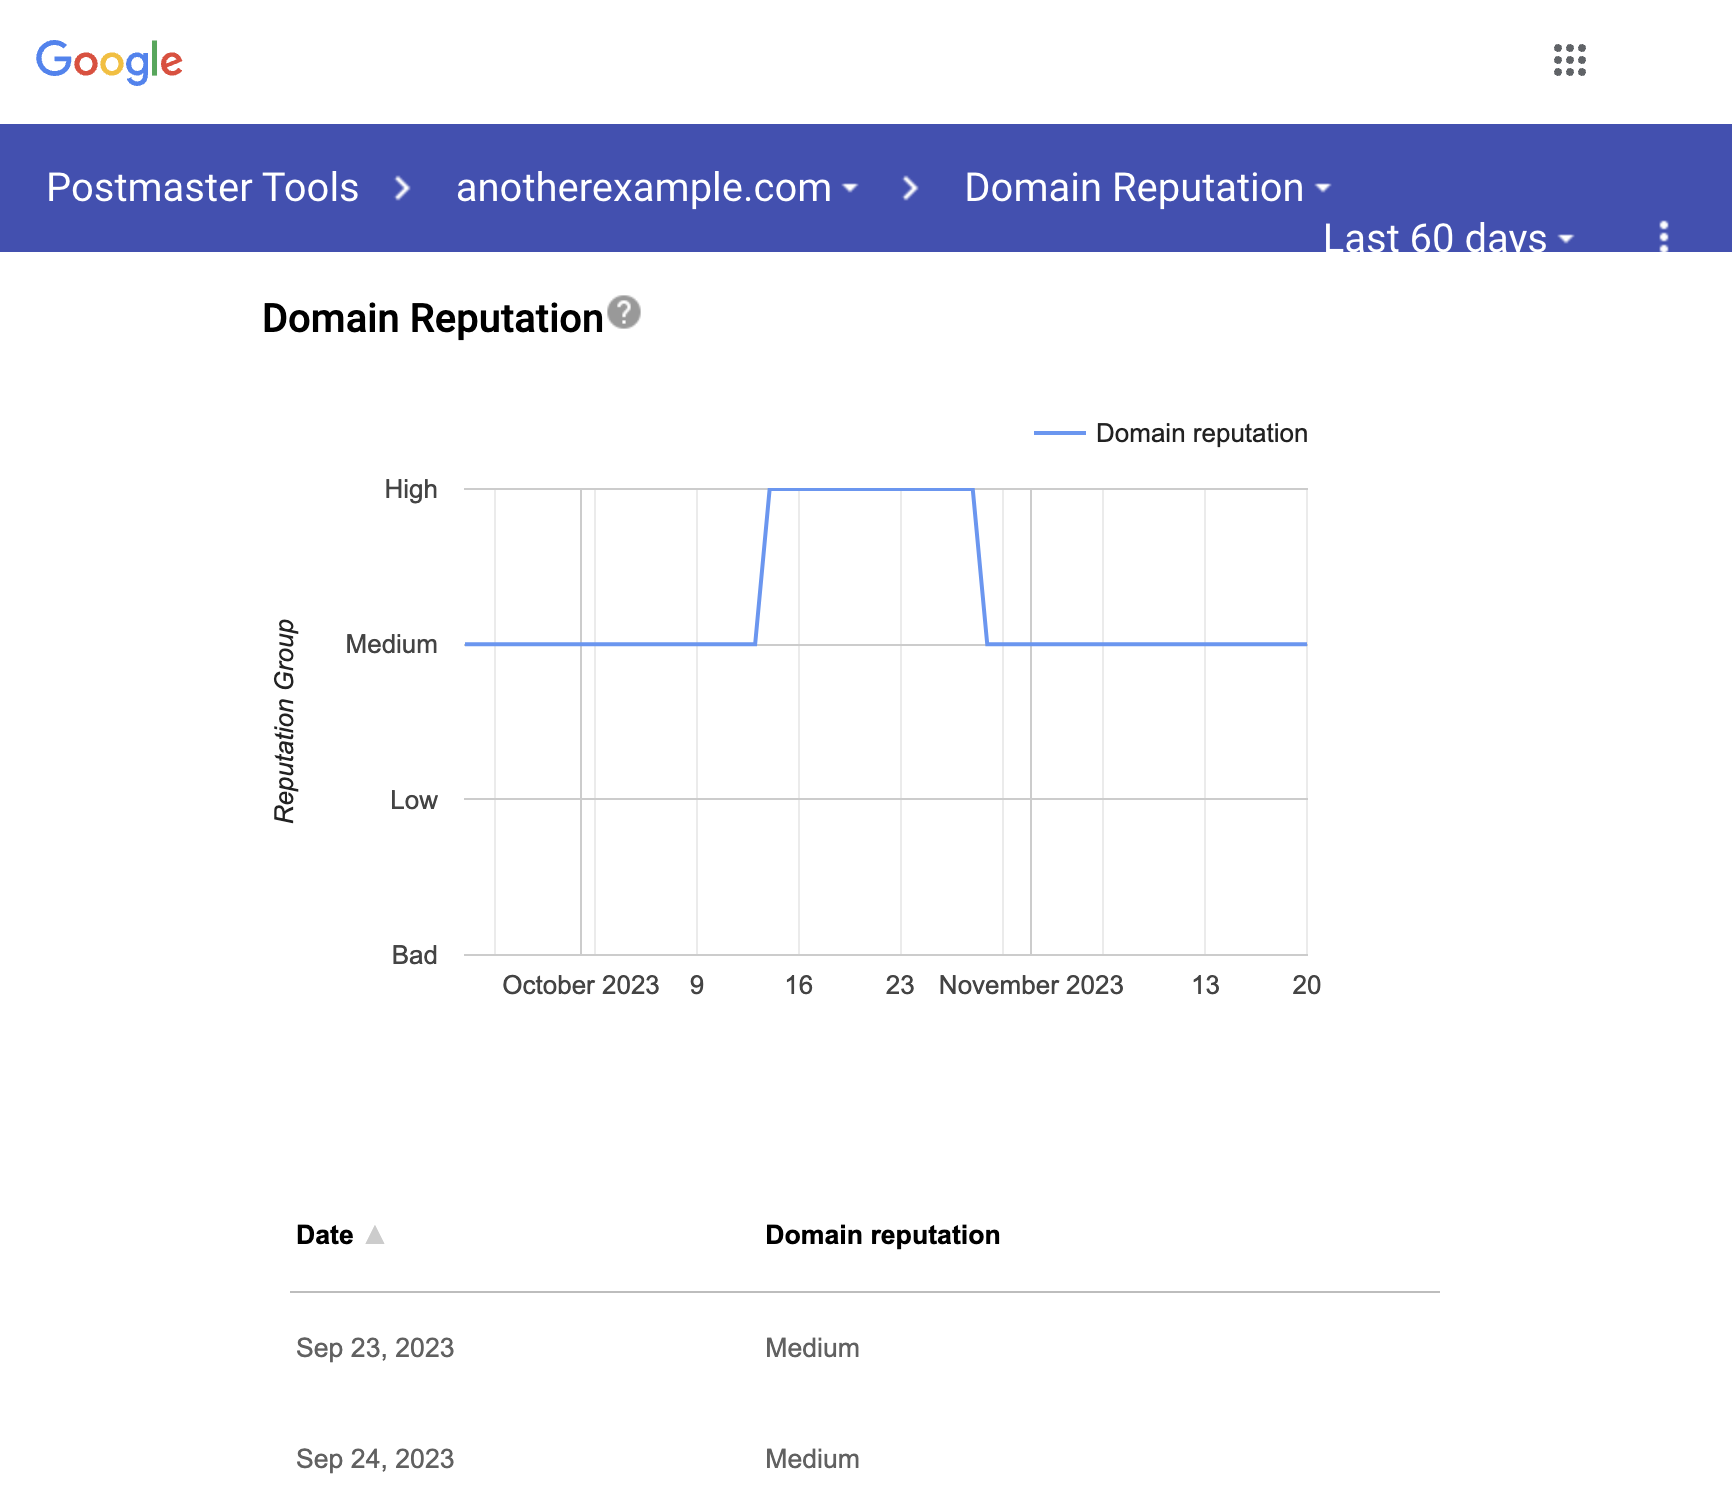
A higher domain reputation means emails from your sending domain (SPF and DKIM) are less likely to get filtered to a recipient’s spam folder or inbox.
About reputations
The definitions of spam below includes mail detected as spam by Gmail’s Spam filter, and mail reported by users as Spam.
- Bad: A history of sending an enormously high volume of spam. Mail coming from this entity will almost always be rejected at SMTP or marked as spam.
- Low: Known to send a considerable volume of spam regularly, and mail from this sender will likely be marked as spam.
- Medium/Fair: Known to send good mail, but has occasionally sent a low volume of spam. Most of the email from this entity will have a fair deliverability rate, except when there’s a notable increase in spam levels.
- High: Has a good track record of a very low spam rate, and complies with Gmail’s sender guidelines. Mail will rarely be marked by the spam filter.
Tip: Keep in mind that spam filtering is based on thousands of signals and domain reputation is just one of them.
Example:
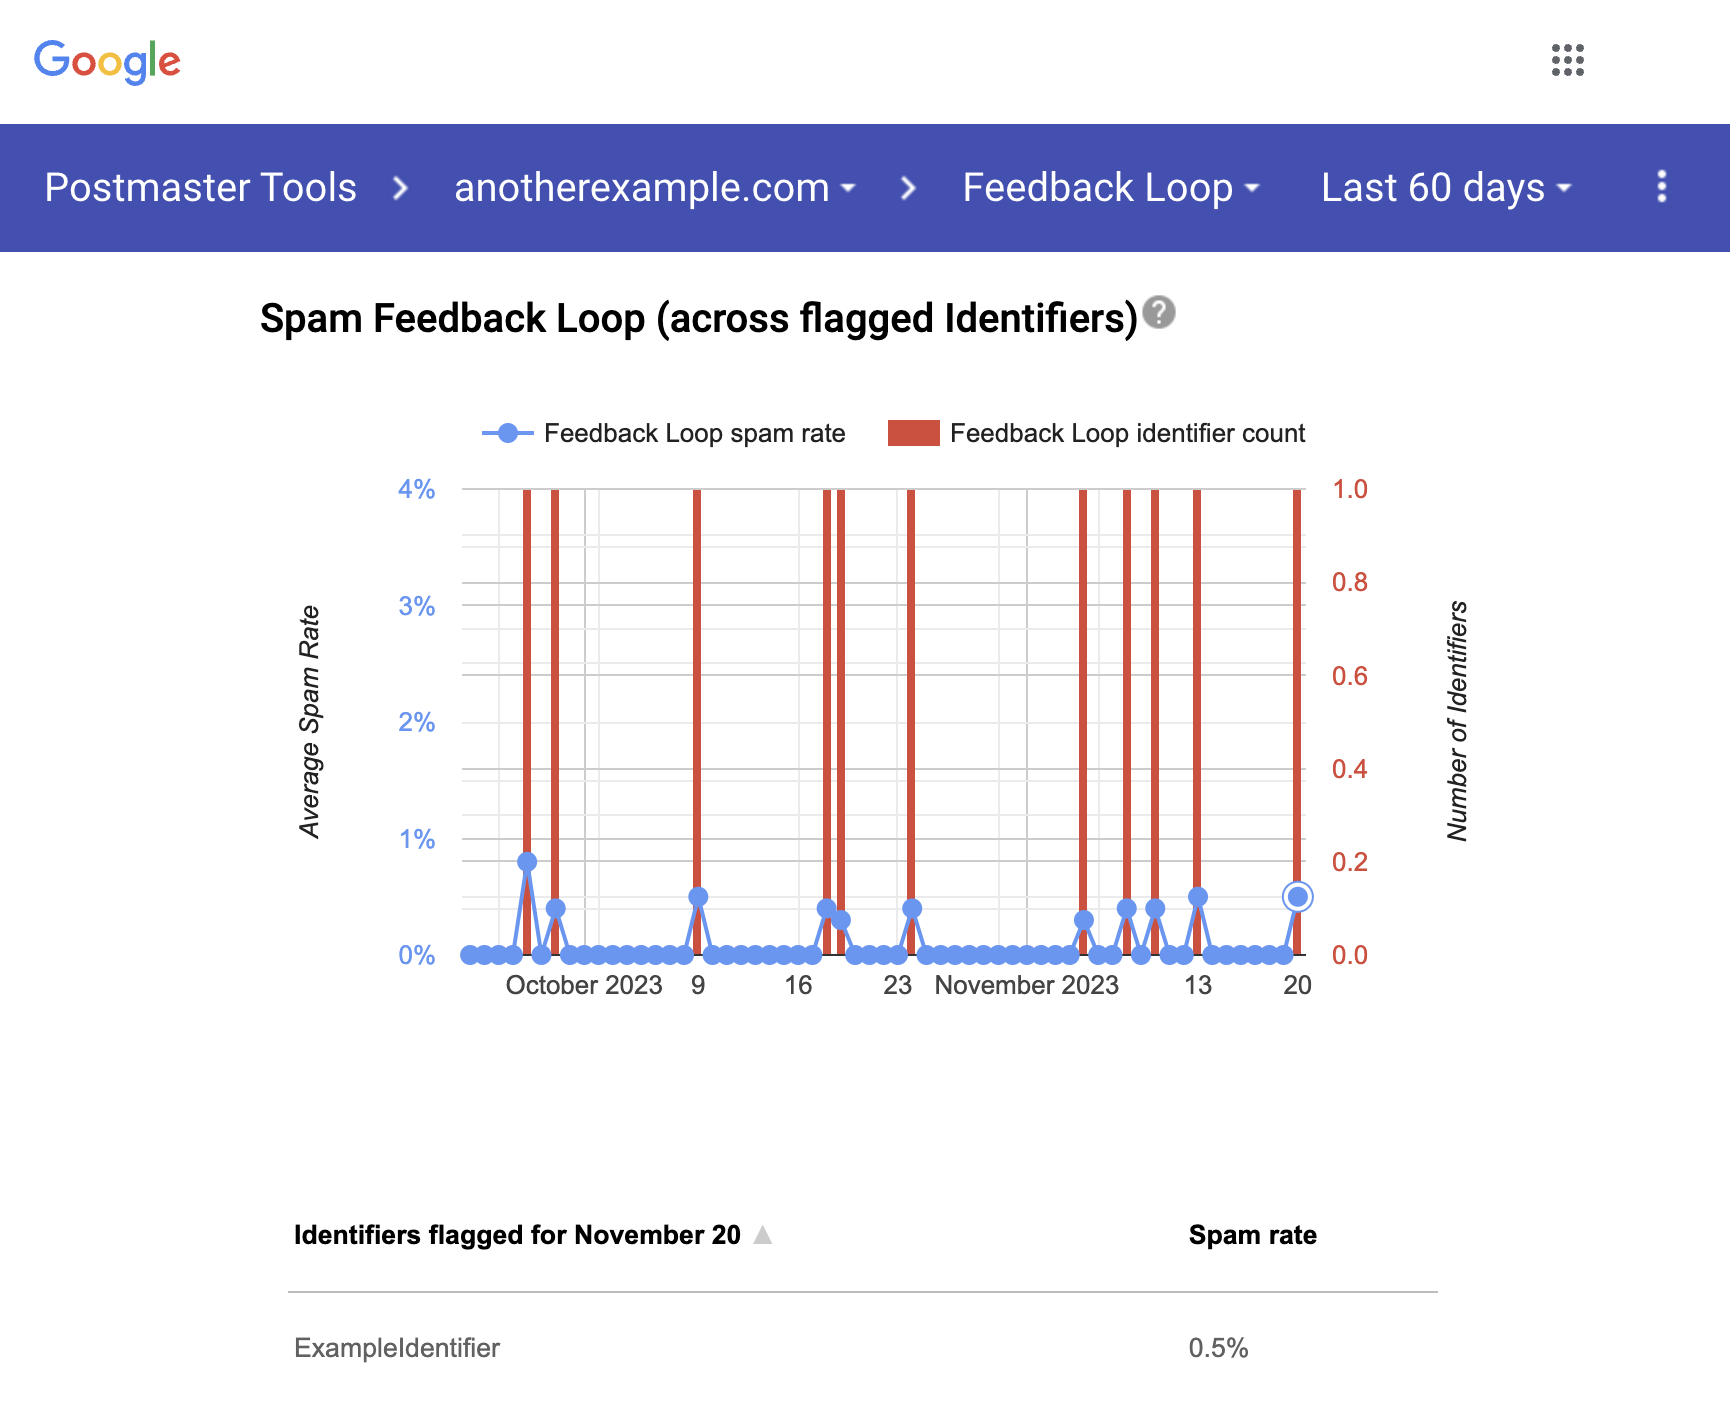
If you’re a large volume sender, you can use the FeedBack Loop (FBL) to identify campaigns in your traffic that are getting a high volume of complaints from Gmail users. The FBL is particularly useful to ESPs to detect abuse of their services.
Note: FBL data will only pertain to @gmail.com recipients.
This dashboard is available after you set up the Gmail Spam Feedback Loop (FBL). To view a table with the identifiers flagged by FBL and their corresponding spam rates, click any data point on the graph.
About FBL graphs
- Average FBL spam rate graph: Shows average spam rate across all identifiers flagged by FBL on a given day (when applicable) over time.
- Identifier volume graph: Shows the number of unique identifiers flagged by FBL per day (when applicable) over time.
How to implement the FBL
Header format
Feedback-ID: a:b:c:SenderId
Feedback-ID: Name of the Header to be embedded.a,b,c: Optional fields that can be used by the sender to embed up to 3 Identifiers (campaign/customer/other).SenderId: Mandatory unique Identifier (5–15 characters) chosen by the sender. It should be consistent across the mail stream.
About the data
The aggregate data will be generated for the first 4 fields (as separated by ‘:’) of the Feedback-ID: , starting from the right side. If the SenderId is empty, no data will be generated. If another field is empty, data will be generated for the rest of the fields.
In order to prevent spoofing of the Feedback-ID, the traffic being sent to Gmail needs to be DKIM signed by a domain owned (or controlled) by the sender, after the addition of this header. This domain should be added and verified to the Gmail Postmaster Tools, so the sender can access the FBL data.
NOTES
- Senders should ensure that their traffic has only one such verified header.
- Senders will have to publish the IPs from which they’re sending mail in the SPF records of their signing domains. The sending IPs must have PTR records and resolve to a valid hostname (preferably one of the DKIM domains).
- For a given day’s traffic, FBL reports are generated only if a given Identifier is present in a certain volume of mails as well as in distinct user spam reports.
- FBL data will be aggregated on each Identifier independently. This also allows for the use of less than 3 Identifiers, if needed.
- For a given day’s traffic, the sender should ensure that the Identifiers across fields not repeated, so that data is not aggregated across unrelated Identifiers. If there is a concern about the uniqueness of the Identifier namespace, or if the sender prefers for the data to be grouped between two Identifiers, the hash of one Identifier can be appended to the other.
- When choosing the Identifiers, the sender should not use a parameter that will be unique across every single mail (for example, a unique Message-ID).
Below is an example for illustration:
Feedback-ID: CampaignIDX:CustomerID2:MailTypeID3:SenderId
-
CampaignIDX: Campaign Identifier specific to Customer2 and is unique across the board (that is, no 2 customers share the same campaign ID). -
CustomerID2: Unique customer Identifier. -
MailTypeID3: Identifier for the type of mail (a newsletter vs. a product update, for example) and can be either unique or common across customers, based on how the sender wants to view the data. -
SenderId: Sender’s unique Identifier and can be used for overall statistics.
In the above case, Google would send the spam percentages for each of the 4 Identifiers independently, if they had an unusual spam rate.
Example:
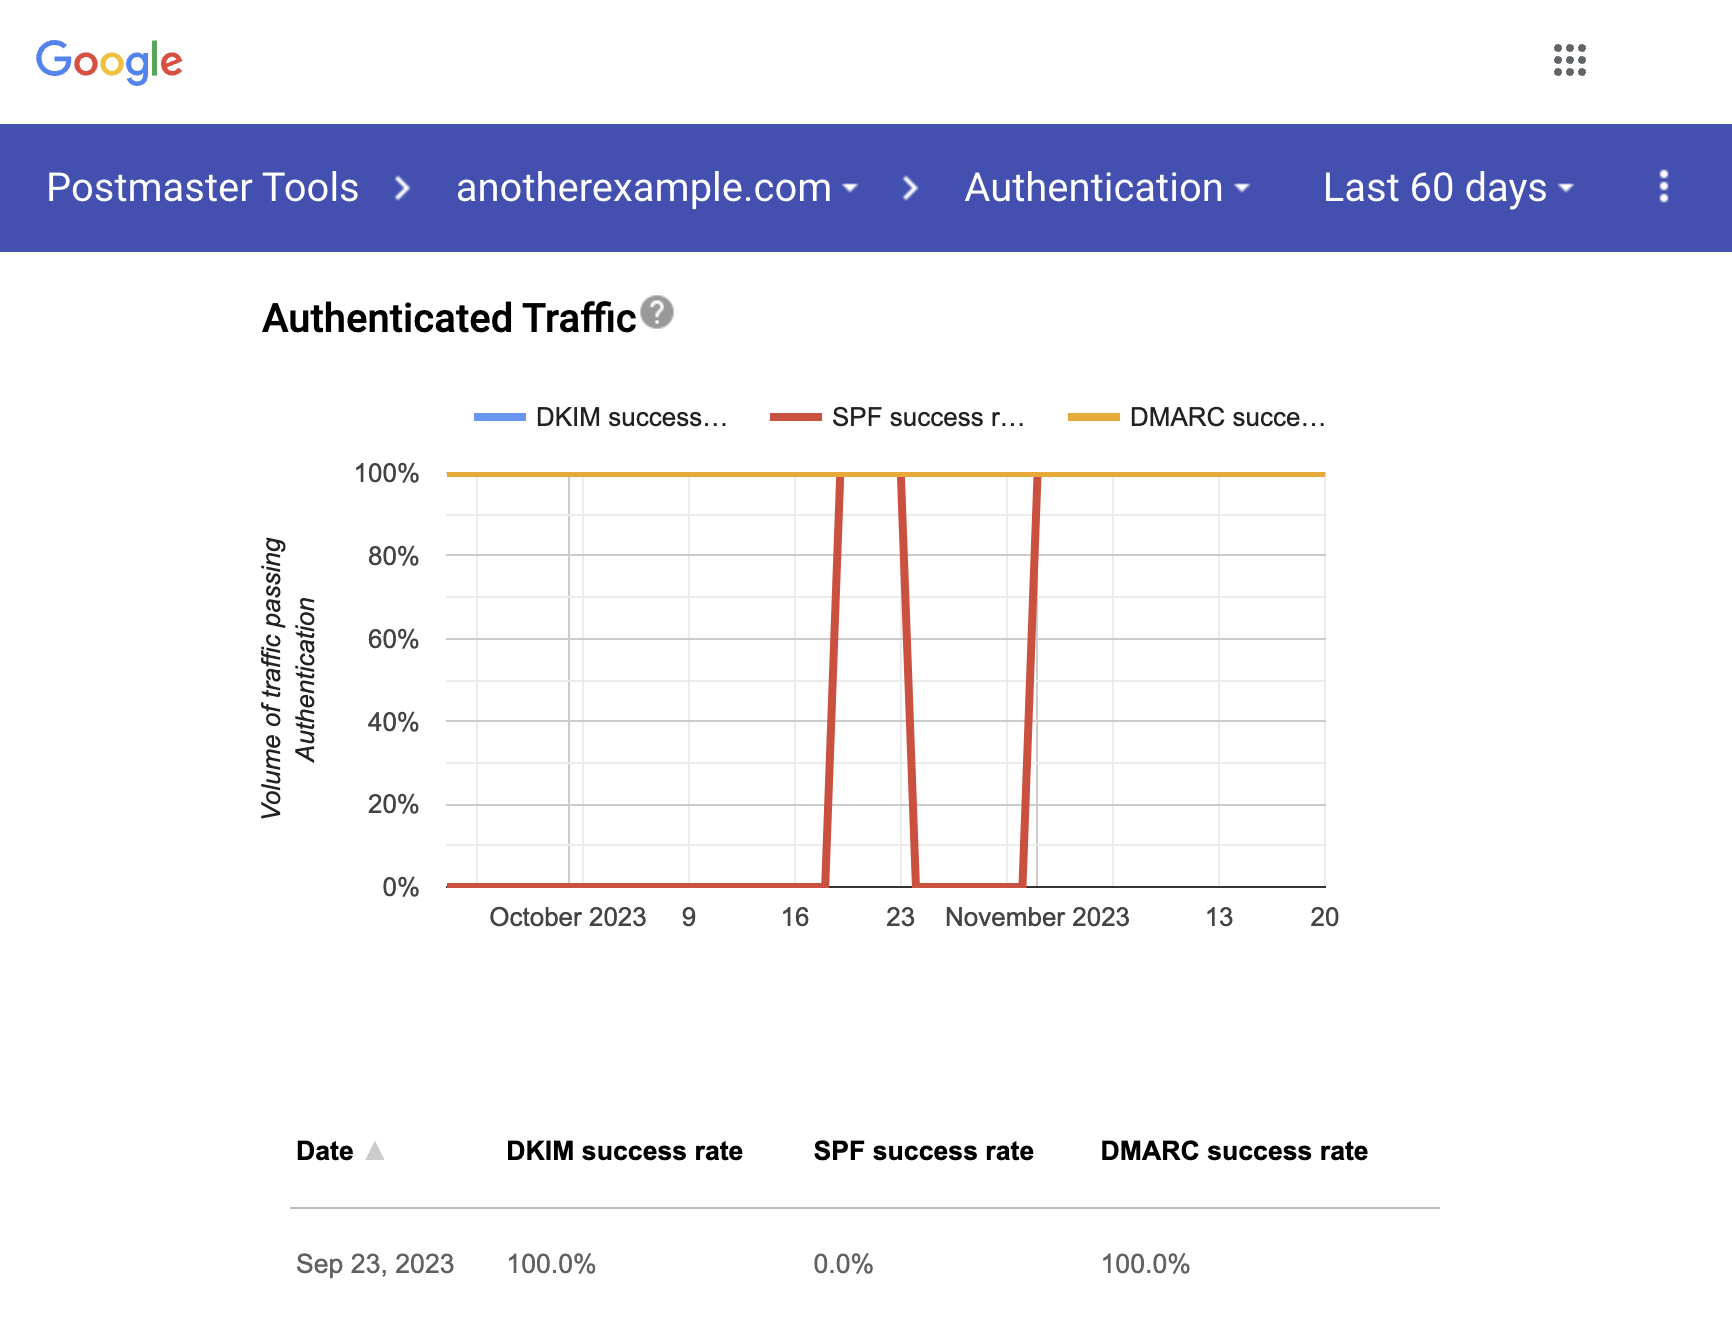
This dashboard shows the percentage of your emails that passed SPF, DKIM, and DMARC over all received traffic that attempted authentication.
About SPF, DKIM & DMARC graphs
- SPF graph: Shows percentage of mail that passed SPF vs all mail from that domain that attempted SPF. This excludes any spoofed mail.
- DKIM graph: Shows percentage of mail that passed DKIM vs all mail from that domain that attempted DKIM.
- DMARC graph: Shows percentage of mail that passed DMARC alignment vs all mail received from the domain that passed either of SPF or DKIM.
Example:
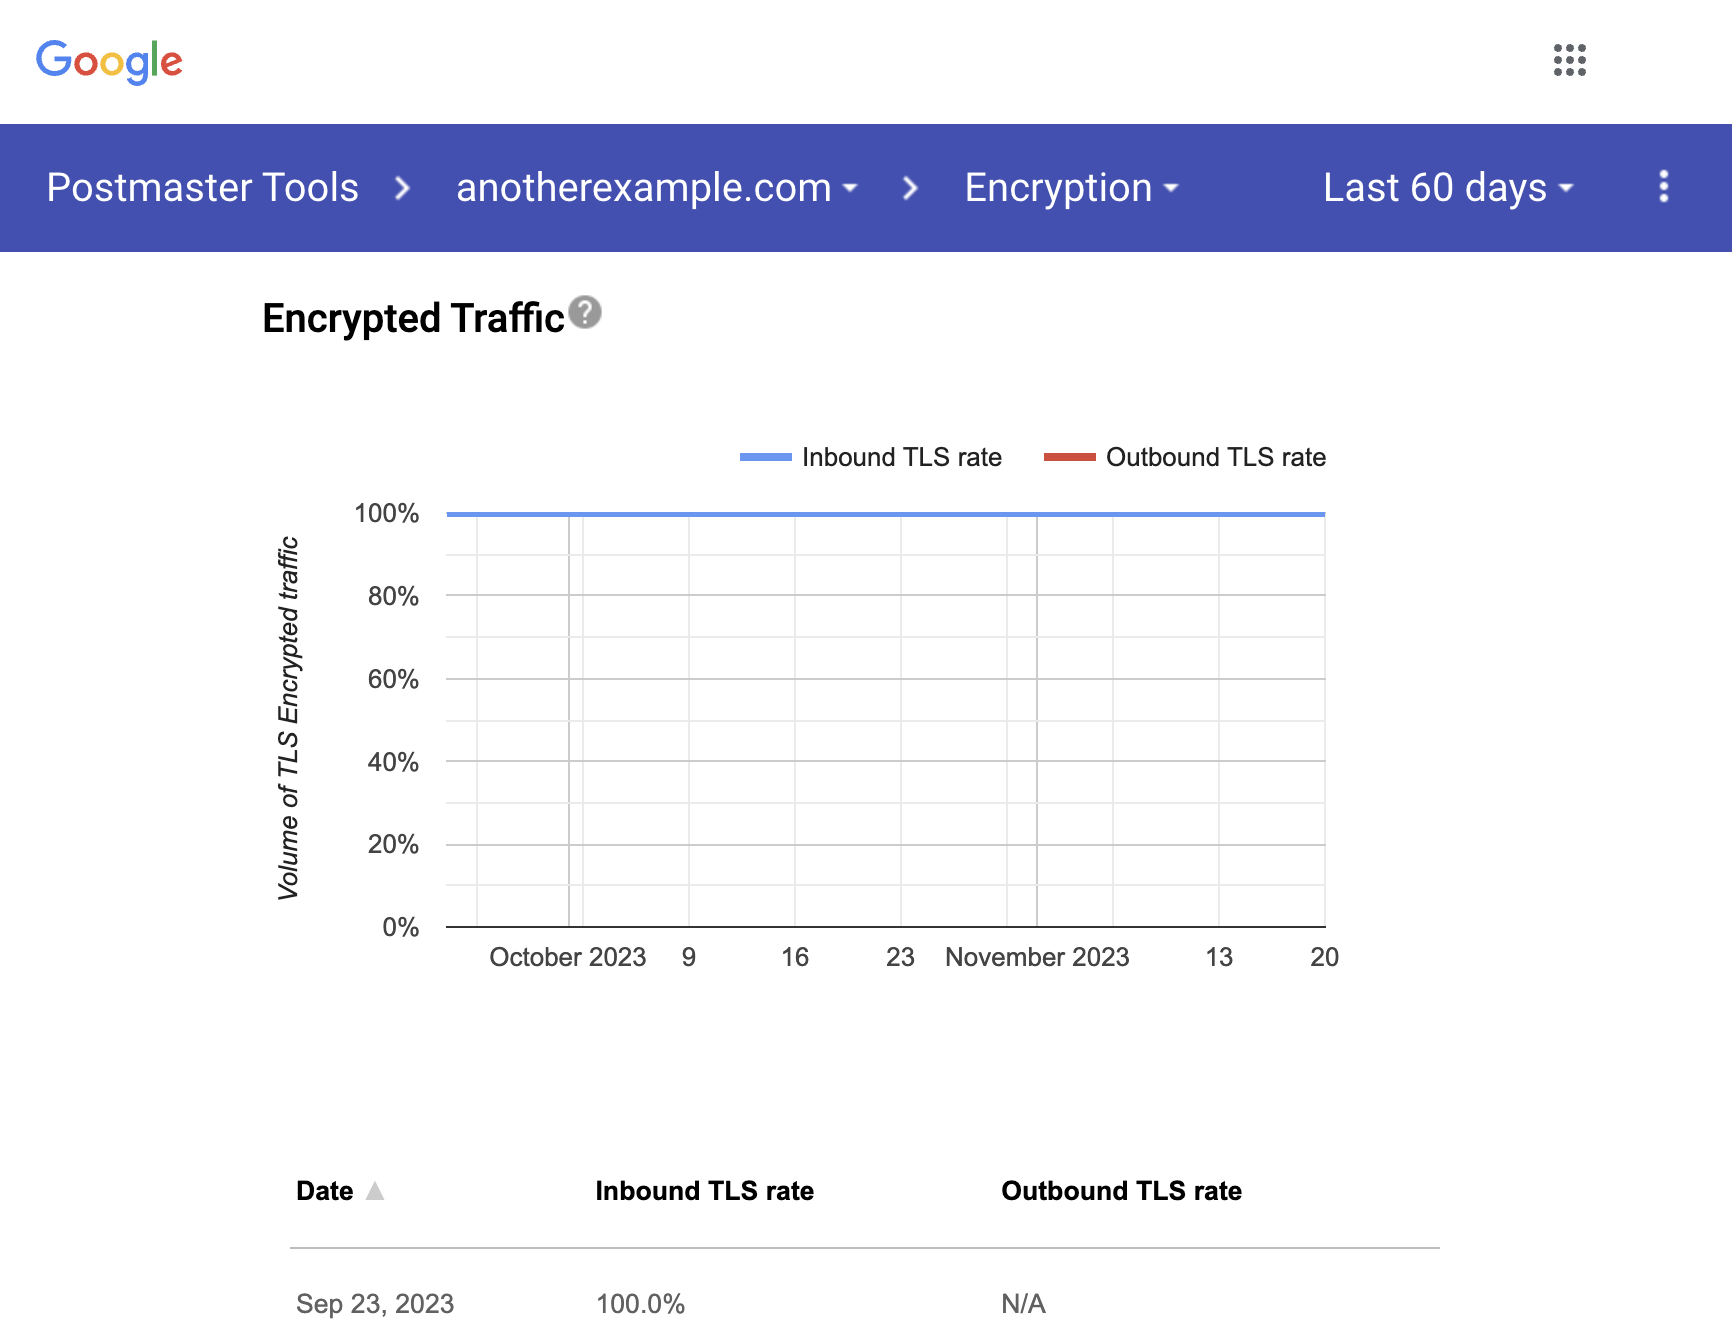
This dashboard shows what percentage of your inbound and outbound traffic is encrypted.
Shows TLS encrypted traffic vs. all mail received from that domain, and consists of two distinct graphs within the same dashboard.
About TLS inbound & outbound graphs
- TLS Inbound: Shows percentage of incoming mail (to Gmail) that passed TLS vs all mail received from that domain.
- TLS Outbound: Shows percentage of outgoing mail (from Gmail) that was accepted over TLS vs all mail sent to that domain.
Example:
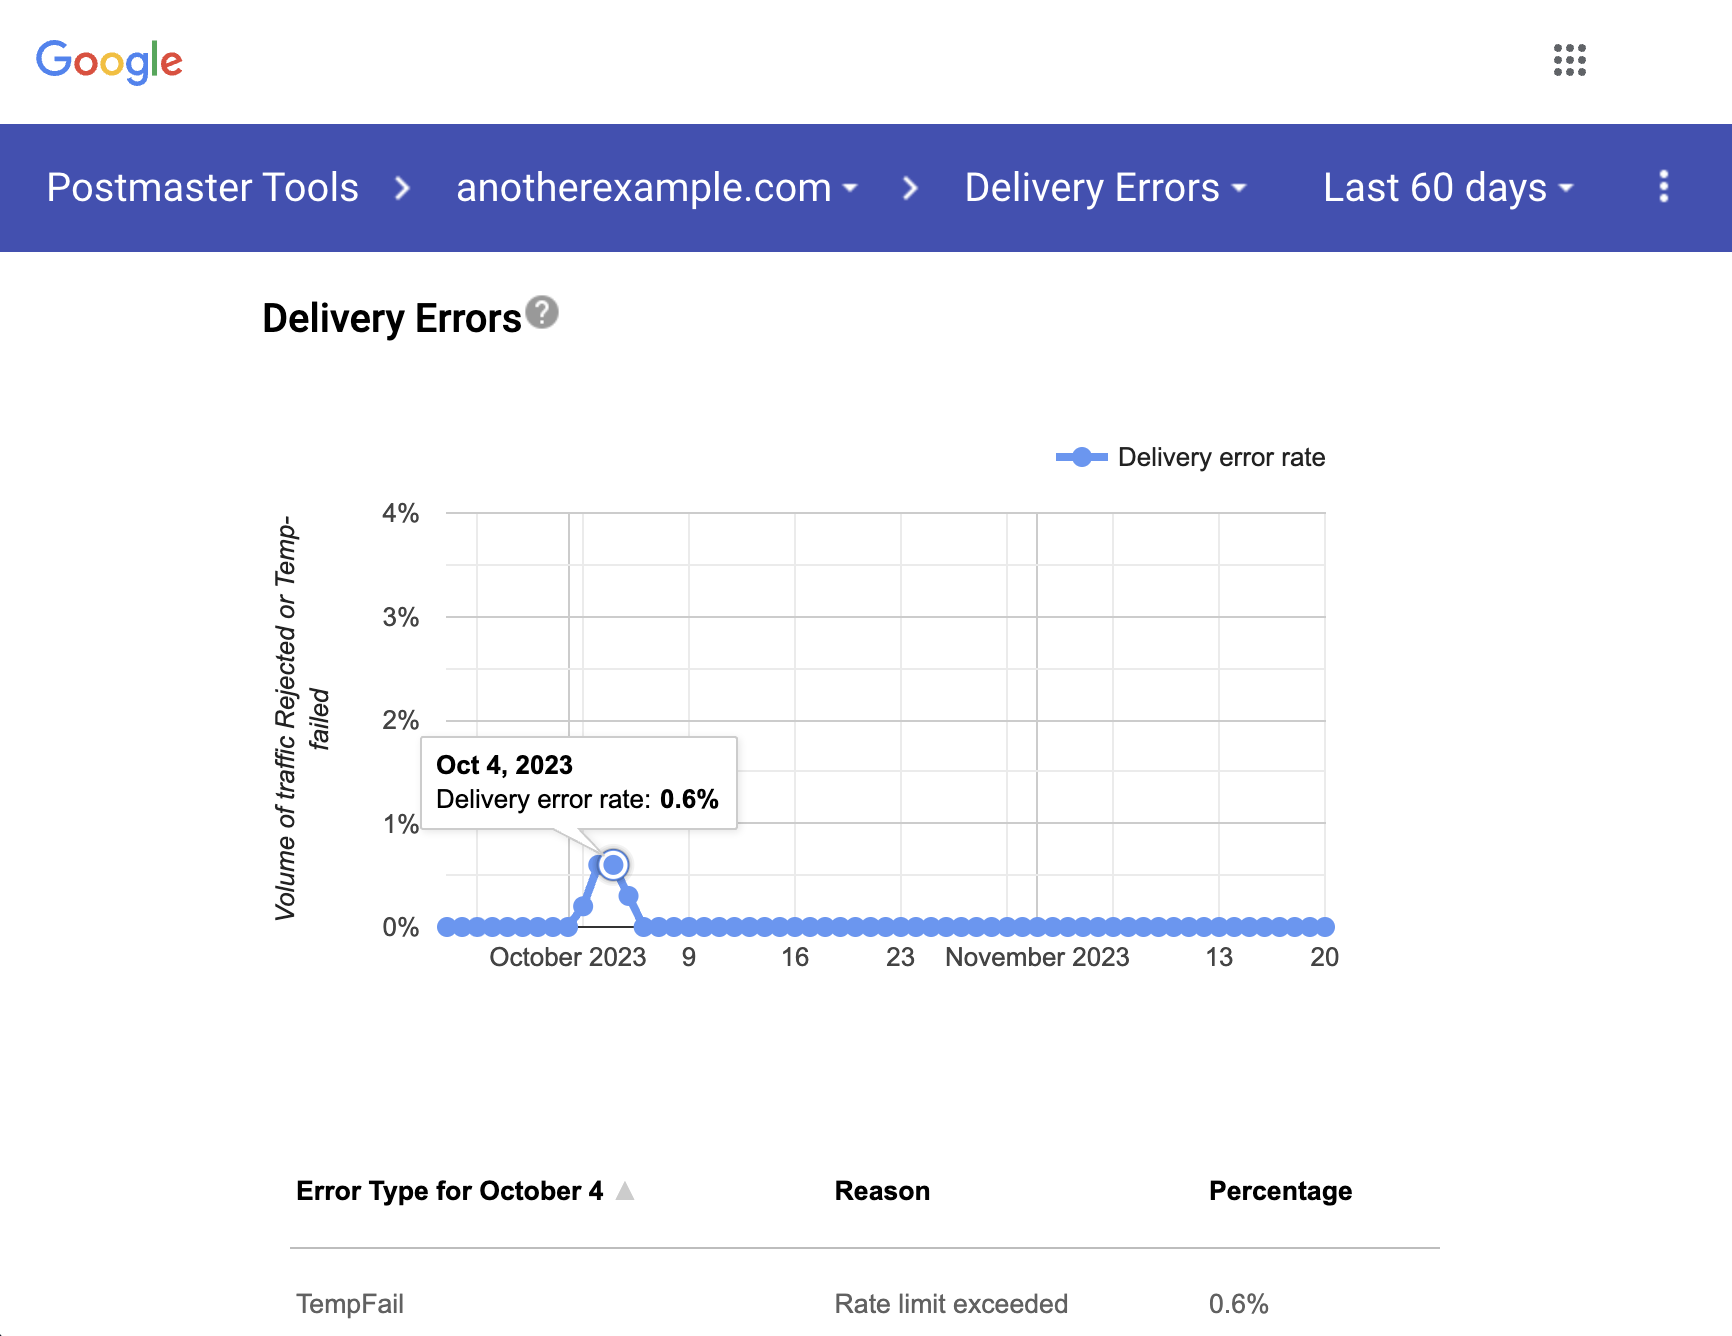
This graph monitors what percentage of your total emails were rejected or temporarily failed as compared to all authenticated traffic. Under the graph, you can view a list of reasons an email failed.
NOTE: You can click on a data point to display additional information.
About delivery errors
- Rate limit exceeded: The Domain or IP is sending traffic at a suspiciously high rate and temporary rate limits have been put in place.
- Suspected spam: The traffic is suspected to be spam by our systems.
- Email content is possibly spammy: The traffic is suspected to be spammy specifically because of the content.
- Bad or unsupported attachment: Traffic contains attachments not supported by Gmail.
- DMARC policy of the sender domain: The sender domain has set up a DMARC rejection policy.
- Sending IP has a low reputation: The IP reputation of the sending IP is very low.
- Sending domain has a low reputation: The Domain reputation of the sending domain is very low.
- IP is in one or more public RBLs: The IP is listed in one or more public Real-time Blackhole Lists (RBLs). Work with the RBL to get your IP de-listed.
- Domain is in one or more public RBLs: The Domain is listed in one or more public Real-time Blackhole Lists. Work with the RBL to get your domain delisted.
- Bad or missing PTR record: The sending IP is missing a PTR record.
Example:
- SPF and DKIM authentication
- From: header alignment
- DMARC authentication
- Encryption
- User-reported spam rate
- DNS records
- One-click unsubscribe
- Honor unsubscribe
Each of them can display either a green tick (indicating compliance) or a red one (indicating that some aspects need attention).
At the time this guide was written, there were two potential outcomes: “Compliant” and “Needs work.“
Here is an example for a problematic sender:
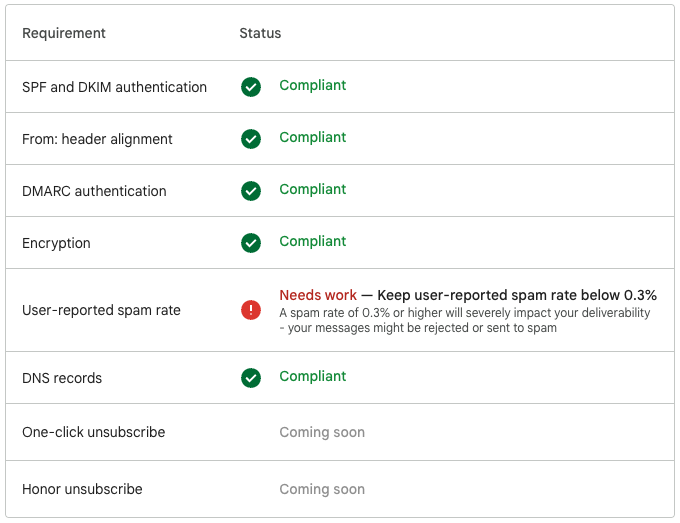
In order to be compliant, we encourage all the senders to review the Email Sender Requirements available here.
NOTES:
This page will also provide you with the accurate time of the last data update. It is typically about 2 days behind, similar to other data accessible through Google Postmaster Tools.
- The “compliance” status takes into account more days at the same time; you might have fixed something but the “Needs work” might still appear because of not compliant traffic falling into the rolling average
In case you pick a subdomain, please note that some of these requirements might be checked on the main domain instead
Only domains actively used in the “From:” header and generating sufficient daily volume will display data here.
SPF and DKIM authentication
Known errors:
Needs work — Set up both SPF and DKIM authentication
SPF prevents spammers from sending unauthorized messages that appear to be from your domain. Receiving servers use DKIM to verify that the domain owner actually sent the message.
From: header alignment
Known errors:
Needs work — Ensure the From: header aligns with either SPF or DKIM
For direct mail, the domain in the sender’s From: header must be aligned with either the SPF domain or the DKIM domain. This is required to pass DMARC alignment.
DMARC authentication
Known errors:
Needs work — Set up DMARC authentication
DMARC lets you tell receiving servers what to do with messages from your domain that don’t pass SPF or DKIM: do nothing, quarantine, or reject
Encryption
User-reported spam rate
Needs work — Keep user-reported spam rate below 0.3%
A spam rate of 0.3% or higher will severely impact your deliverability – your messages might be rejected or sent to spam